If you’ve tried to enter the geometry of a mullet (mixed wheel) bike into the Bike Geometry Calculator, you may have struggled getting the calculated numbers like wheelbase or bottom bracket height to match the manufacturer’s published numbers. Mullet bikes make things complicated since the calculations I use to generate the bike silhouettes are sensitive to the tire diameters, and those aren’t published by bike manufacturers. In order to get the geometry in the calculator to match the manufacturer’s geometry numbers, you need to do a bit of tweaking in the calculators. It takes more effort to get accurate results with a mullet bike, but if you follow the steps below, you should be able to get good results that fairly closely match the manufacturer’s geometry table.
Read on for more explanation of these three steps.
Step #1 - Adjust Bottom Bracket Drop
Subtract about 5 mm from the manufacturer's published bottom bracket drop when entering it into the calculator.

Why? Bottom bracket drop is calculated as the vertical distance between the bottom bracket and a line connecting the two axles. To keep things simple and solvable with the methods and software I’m using and the information from manufacturer geometry tables, I assume the bottom bracket drop is measured from the rear axle. This allows the calculator to position the bottom bracket with respect to the rear hub by working out a triangle based on the chainstay length and bottom bracket drop, and then from there, calculate the location of the other parts of the bike (top of head tube through reach and stack, top of seat tube through seat tube angle and length). I could work backward, using the wheelbase as an input and solve the location of the bottom bracket with a different approach, but I’ve discovered wheelbase is not always the most accurate measurement in manufacturer geometry tables. I could also get around this simplification if both rear center and chainstay length were given but it’s not very common for manufacturers to give both. So, on a bike with two wheels the same size, the virtual line between axles is horizontal and therefore the bottom bracket drop is the same as the measurement below the rear hub that I use. Works great for bikes with two wheels the same size, but it’s not a perfect assumption with a mixed wheel bike. Mullet bikes make this part of the math a bit complicated. The bottom bracket drop on a mullet bike that manufacturers list in their geometry tables is usually measured in the same way I described above: a line is drawn between the two axles and the distance between the bottom bracket and the line directly above. Since the bike has a taller front tire, that line ends up with an upward slope, and the point of bottom bracket drop measurement along that sloped line ends up higher than the rear axle.
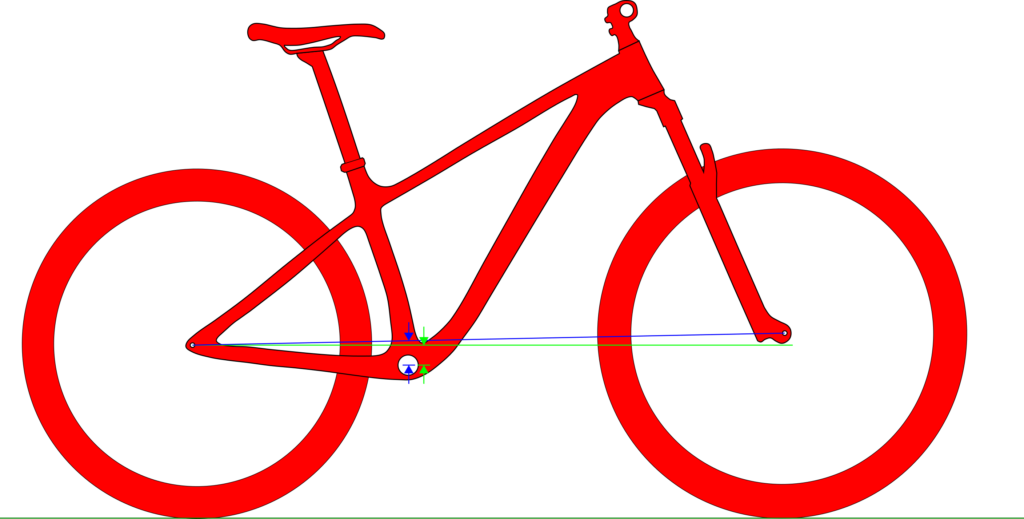
The way I reconstruct the bike from the geometry table doesn’t have enough information to work out the slope of that line and therefore identify the exact location of the point of measurement, since the wheel diameters aren’t provided. For most modern bikes, the point of measurement will usually end up between 4 and 7 mm higher than the rear hub height. The bigger the difference in front and rear wheel diameters or the shorter the wheelbase, the more it deviates from the rear hub height. So the quick fix is to subtract about 5 mm from the manufacturer’s bottom bracket when you enter the bottom bracket drop into the calculator. As a rule of thumb, subtract 5 mm from the listed bottom bracket drop for a difference of 30 mm between rear and front tire diameters. Tweak that 5 mm from there with an increase of 1 mm for each 10 mm increase in front and rear wheel diameter difference and decrease of 1 mm for each 10 mm decrease in front and rear diameter difference. For example, if your tires are 730 mm in the rear and 750 mm in the front, you have a 20 mm difference, which is 10 less than my rule-of-thumb 30 mm, and should be corrected by subtracting 1 mm from the 5 mm. You would therefore correct the bottom bracket drop by subtracting 4 mm from the listed bottom bracket drop instead of 5 mm.
A few manufacturers, like YT and Santa Cruz, provide the bottom bracket drop relative to the front and rear axles. In this case, use the listed bottom bracket drop wth respect to the rear and don’t worry about the 5 mm correction. The bottom bracket drop used in my calculations would match the listed bottom bracket drop with respect to the rear wheel.
Step 2: Adjust the rear wheel diameter.
Increase or decrease the rear wheel diameter to match the calculated bottom bracket height with the manufacturer's numbers.

Why? Manufacturers usually publish the bottom bracket drop and the bottom bracket height. Bottom bracket drop does not depend on wheel diameter but bottom bracket height does. With the bottom bracket dropped locked in step 1, you can tweak the rear wheel height until the calculated bottom bracket height measures the same as the manufacturer’s published number to determine the rear wheel diameter the manufacturer uses.
Step 3: Adjust the front wheel diameter.
Increase or decrease the front wheel diameter until the calculated fork axle to crown + lower headset stack measurement approximately matches the sum of the fork manufacturer's axle-to-crown distance and the expected stack height of the lower headset cup.

Why? Without knowing the manufacturer’s assumed tire diameter, the best the calculator can do is work out the geometry numbers based on your best guess. My calculator works out the axle-to-crown + headset stack necessary to put the front tire on the same plane as the rear. It uses all the frame parameters and then projects the front hub down along the head angle until it the tire touches the ground, and then works out the length of the fork and lower headset cup corresponding to that tire diameter. By adjusting the front wheel diameter until you land on a reasonable axle-to-crown + lower headset cup distance, you will be able to determine the size of the tire the manufacturer uses in their geometry chart. The lower cup assembly on most ZS headsets adds about 4-5 mm of height below the headtube. For EC headsets add more (around 15 mm) and IS headsets less (possibly 0 mm or even negative). For example, for a bike with mixed wheels, 140 mm Rock Shox fork (551 mm axle-to-crown), and ZS headset (5 mm lower cup stack height), increase or decrease the front wheel diameter, until the calculated axle-to-crown + lower headset cup measurement is approximately 556 mm.